One of the most misunderstood and undervalued aspects of living pain free is stretching and strengthening.
Doing the right with the correct technique can minimise or eliminate your pain and help you look and feel 10 years younger.
Most people focus on “stretching” (usually the wrong way), and they only focus on ‘flexibility,’ when ‘mobility’, ‘muscle balance’ and ’tissue release’ are much more effective. Just read below and you’ll discover the top 5 stretches I recommend if you’d like to look and feel up to 10 years younger…
It only takes 5 minutes per day!
In about 3-4 days from now you’ll notice a BIG difference using these exercises.
Keep going strong!
1. Shoulder Bridge/Piriformis Stretch
Pelvic tilt is taught to almost everyone who has back pain, especially low back pain. It teaches us to use our abdominal and gluteal muscles in a way that supports and lengthens the lower back. Here we start with pelvic tilt, and for those who feel comfortable, move to a spinal articulation with pelvic curl:
Lie on your back with your knees bent and your feet flat on the floor. Your feet, ankles, and knees are aligned and hip-distance apart.
This exercise starts in neutral spine. In neutral spine, the natural curves of the spine are present, so the lower back is not pressed into the mat.
Begin Pilates Pelvic Tilt
Inhale.
Exhale: Do a pelvic tilt by engaging your abdominal muscles, pulling them in so that your lower tummy moves down toward your spine. Let that action continue so that the spine lengthens and the abs press the lower spine into the floor.
In the pelvic tilt position, your back is very long against the floor, and the pelvis is tilted so that the pubic bone is a little higher than the hip bones.
Inhale to release back to the floor, or go on to shoulder bridge:
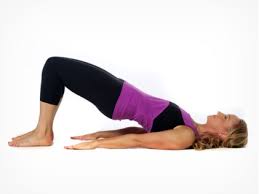 Continue with Full Shoulder Bridge
Inhale: Press down through your feet allowing the tailbone to begin to curl up toward the ceiling. The hips rise, then the lower spine, and, finally, the middle spine.
Come to rest on your shoulders at the level of your shoulder blades, with a nice straight line from your hips to your shoulders. Do not arch beyond this point. Support this movement with your abdominals and gluteals or buttocks muscles. If you feel any pain in your back or cramping in your hamstrings you are not using your core or gluteals correctly.
Exhale: As you let your breath go, use abdominal control to roll your spine back down to the floor. Begin with the upper back and work your way down, vertebrae by vertebrae, until the lower spine settles to the floor.
Inhale: Release to neutral spine.
Repeat this exercise 3 to 5 times
Finish with a Piriformis Stretch or “Seven” Stretch
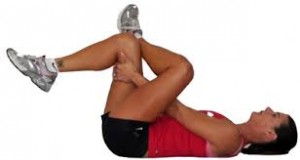
Lie on the floor with the affected leg crossed over the other leg at the knees (like you’re making a number seven) and both legs bent. Gently pull the lower knee up towards the shoulder on the same side of the body until stretch is felt. Hold stretch for 30 seconds, then slowly return to starting position. Aim to complete a set of three stretches on each side.
2. Chest Lift/Spine Twist
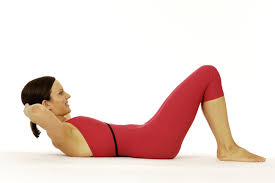
One of the common causes of back pain is not weak back muscles, but weak abdominal muscles. Chest lift is a great ab strengthener.
Do this exercise with care. Your hands give some support to the back of your head, but the work needs to come from the abs – not from momentum or pulling your head up. If you get neck pain, stop and go on to the next exercise.
Lie on your back with your knees bent, feet flat on the floor. Legs and feet are parallel – lined up so that your hip, knee and ankle are in one line, and the toes are pointing directly away from you.
You are in neutral spine position with the natural curve of the lower spine creating a slight lift off the mat.
Keep your shoulders down as you bring your hands behind your head with the fingertips touching. Your hands will give light support the base of your skull, but your elbows will stay open throughout the exercise.
Inhale
Exhale: Slowly pull your belly button down toward your spine and keep going, allowing your spine to lengthen out along the mat. Simultaneously, tilt your chin slightly down and slowly lift the upper spine off the mat until the base of the scapula is just brushing the mat.
There is a deepening feeling under the bottom ribs as you lift.
Remember, the work is in your abs, which are in a deep concave position. Your neck and shoulders stay relaxed, and the movement does not create tension in the legs.
Pause at the top and inhale. Draw the abdominals in deeper.
Exhale: Keep the abdominals drawn in as you slowly lower back to the mat.
Inhale Repeat 6 – 8 time
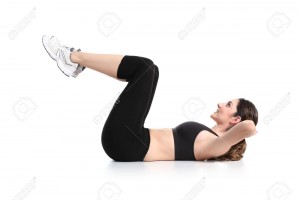
Progress to Table Top Legs
If you feel comfortable in your spine you could progress this exercise to repeating the above steps with your legs in table top position, with your hips bent to 90 degrees and your knees at 90 degrees.
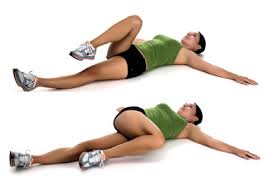
Finish with a Spine Twist Stretch
This is one of the best exercises to mobilise the spine and stretch the abdominals.
Start by laying on your back, lift your right leg with your knee bent. Grab the outside of your right knee with your left hand and stretch your right arm out to the side. Pull your right leg across your body and try to lower it to the ground pressing down on your right knee (unless you’re already feeling the stretch to capacity) keep your right shoulder blade on the ground or as close to as possible. You’ll feel this stretch in quite a few areas depending on where you are most tight, including your glutes, hips, groin, lower, mid &upper back, inner & outer thighs. Hold for 4-5 breathes (exhale as you push down on the knee) this is called breathing into the stretch eg: exhaling at the hardest part. Repeat on the other side.
3. Swan/Child’s Pose
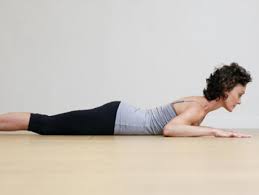
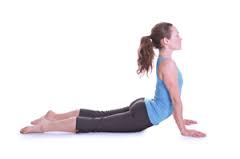
Swan prep strengthens the back extensors, the muscles the hold us upright. These muscles are often weak and over-stretched in people who have back pain.
Develop this exercise slowly. You might not come up as high as our model. That’s OK. Just a few inches to start is fine.
Begin with Pilates Swan Prep:
Lie on the mat face down.
Keep your arms close to your body as you bend your elbows to bring your hands under your shoulders. Shoulders should be away from the ears.
The legs are usually together, but it is acceptable to do this exercise with the legs shoulder-width apart.
Engage your abdominal muscles, lifting your belly button up away from the mat. The abdominals remain lifted throughout the exercise.
Inhale: Lengthen your spine, sending energy through the top of your head as you press your forearms and hands into the mat to support a long upward arc the upper body. You might come up just a few inches.
Keep your neck long. Don’t make a crease by tilting your head back.
Protect your low back by sending your tail bone down toward the mat.
Exhale: Keep your abdominals lifted as you release the arc, lengthening your spine as your torso returns to the mat in a sequential way: low-belly, mid-belly, low ribs and so on.
Repeat 3 to 5 times
Progress to full swan
If you have no spinal pain and you have the strength in your arms to keep your shoulders down you can progress to full swan. Check with your physio or doctor if this exercise is safe for you. Do perform the above regime for swan prep but instead of keeping the forearms on your mat you extend the elbows using the same principles as above.
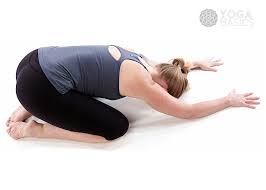 Whenever we exercise into extension we always reverse the spine into flexion. Child’s pose is an easy and restful flexion stretch for the back which should always be performed after the swan.
Begin Child’s Pose:
Start by kneeling on your mat with your butt on your heels.
With your toes together, open your knees to at least hip distance apart.
Lean forward and drape your body over your thighs so that your forehead rests on the floor.
Reach your arms out in front of you. Alternately, you can leave your arms along your sides. Try both and see which feels best to you.
Breathe deeply and relax. Release any tension you might be feeling in your lower back, neck, or hips. Give this exercise time to work. It can take a few minutes to allow your body to relax into the stretch.
4. Swimming/Thread-The-Needle
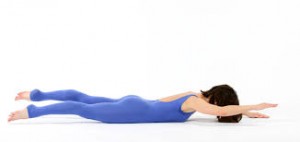
Swimming takes the strength of the back extension work a little further than swan prep did. It strengthens the back, but you must keep a long spine and use abdominal support for it to work.
Lie on your stomach with the legs straight and together.
Keeping your shoulder blades settled in your back and your shoulders away from your ears, stretch your arms straight overhead.
Pull your abs in so that you lift your belly button up away from the floor.
Reaching out from your center, extend your arms and legs so far in opposite directions that they naturally come up off the floor.
At the same time, get so much length in your spine that your head moves up off the mat as an extension of the reach of your spine. Keep your face down toward the mat – don’t crease your neck.
Protect your lower back by anchoring your pubic bone to the floor.
Continue to reach your arms and legs out very long from your center as you alternate lifting right arm/left leg, then left arm/right leg, pumping them up and down in small pulses.
Bonus challenge: Coordinate your breath with the movement so that you are breathing in for a count of 5 kicks, and out for a count of 5.
Do 2 or 3 cycles of 5 counts – moving and breathing in, and 5 counts moving and breathing out.
Finish with our Thread-the- Needle stretch.
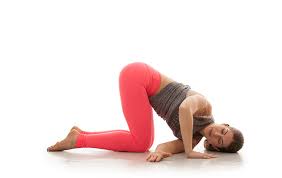
Begin on your hands and knees. Place your wrists directly under your shoulders and your knees directly under your hips. Point your fingertips to the top of your mat. Place your shins and knees hip-width apart. Center your head in a neutral position and soften your gaze downward. This is Table Pose.
On an exhalation, slide your left arm underneath your right arm with your palm facing up. Let your left shoulder come all the way down to the mat. Rest your left ear and cheek on the mat, then gaze toward your right.
Keep your right shoulder moving back and your hips raised. Do not press your weight onto your head; instead, adjust your position so you do not strain your neck or shoulder.
Let your upper back broaden. Soften and relax your lower back. Allow all of the tension in your shoulders, arms, and neck to drain away.
Hold for up to one minute. To release, press through your right hand and gently slide your left hand out. Return to Table Pose. Then repeat the pose on the opposite side for the same length of time.
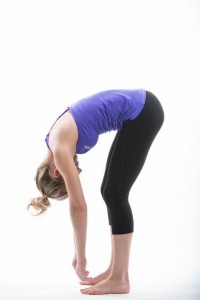
5. Spine Stretch/Standing Roll Down
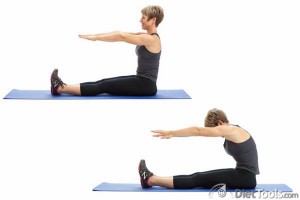
Spine stretch is a good stretch for both the back and the hamstring. But it also teaches you to support and control that stretch by using your abdominal muscles.
Begin Pilates Spine Stretch:
- Sit up tall on your sit bones.
- Your legs are straight in front of you about shoulder width apart. Your knees face the ceiling, and your feet are flexed.
- If your hamstrings are tight you can sit on a small pillow or a folded towel. You can also bend your knees slightly.
 Reach the top of your head to the sky but let your shoulders stay relaxed.
- Inhale and extend your arms out in front of you, shoulder height.
- Alternatively, you can place the fingertips on the floor in front of you between your legs.
- Exhale as you lengthen your spine to curve forward. You are going for a deep C-curve. Don’t collapse. Let your abdominal muscles support you in an up-and-over move.
- Reach your fingers toward your toes.
- Inhale and reach a little further as you enjoy the fullness of your stretch.
- Exhale and initiate your return by using the lower abdominals to bring your pelvis upright. Roll your spine up to sitting.
Remember the best way to master these exercises is to see one of our physiotherapists at Rehabcorp. Using the best technique is crucial for getting the most out of these exercises. If you don’t use the correct technique you may be at risk of injuring yourself. Remember you should not feel any spinal pain with these exercises only a sense of working or stretching the muscles. Our physiotherapists will ensure that these exercises are appropriate for your spine so please take care and come to see us to discuss these exercises in more detail. Participating in our group exercise classes are also a great way to ensure you master these exercises and are performing them correctly at home.
Happy exercising! 🙂
Admin
Latest posts by Admin (see all)
- 5 Exercises to Make You Look & Feel 10 Years Younger - April 6, 2016
- Chronic Pain – The Great Unmentionable - February 24, 2016
- Consistency is Key for Rehab - June 24, 2015

